Thursday, September 1, 2011

Upgrading vSphere 4.0 to vSphere 5.0

Hi All,

In this Blog am showing you how to upgrade vSphere 4.0 to vSphere 5.0,

here am installing vSphere 5.0 on the already installed vSphere 4.0 , vSphere 4.0 is installed on VMware Workstation 7

so lets starts.

I have started the already installed vSphere 4.0

1. In the Below screen you can see already installed vSphere 4.0 , here we are going to upgrade it to vSphere 5.0


2. Select the vSphere 4.0 settings and select CD and show the ISO of vSphere 5.0 which you have downloaded.


3. Now, restart the vSphere 4.0


4. Select the ESC button to get the boot device screen and select CD Rom and enter


5. Select ESXi 5.0 Installer.


6. Now its booting with ESXi 5.0 CD


7. Loading the Screen


8. Here you can see the Welcome Screen for vSphere 5.0 , Click on Enter to continue


9. Select F11 to accept VMware EULA


10. Installation is scanning the available Devices


11. In The below screen it shows the Storage devices, where you want to install, here I have local datastore of 20 GB, selecting the same and click on Enter to continue


12. Installation is gathering the selected device information


13. In the below screen select the first option “Migrate ESX, preserve VMFS datastore” if you are upgrading vSphere 4.0 to vSphere 5.0

And Click Enter to continue


14. Scanning the additional information about the Device


15. The installation is asking for confirmation about Migration , enter F11 to migrate


16. In the below screen vSphere 5.0 migration process is started


17. See the below screen migration process is still going on


18. In the below screen , we are getting Alert to set the VPXA password , upon reboot we can set the password and Enter to continue


19. Installation again contnues


20. Installation is Completed Successfully , here am using trial version of vSphere 5.0 after the trial version you can apply the license for vSphere 5.0


21. Installation done, rebooting the vSphere 5.0


22. Installation successful , now you can login in vsphere 5.0


23. Now login to vsphere 5.0 from vsphere client


24. VMware infrastructure loaded successfully, showing the Trial period remaining.


25. Here you can see my Old VM Inventory present when it was in vsphere 4.0


26. Powering on VM to check whether its working fine or not


27. VM is booting successfully


28. Logging into VM


29. Successfully logged in VM.


VMware vSphere 4.0 upgradation done successfully to vSphere 5.0 without any issues.

Please comment here if you face any issues in upgrading. :)

Saturday, February 12, 2011

Earn Money From Twitter

Well, Twitter is known as a social networking tool where the members can post a “tweet” with maximum of 140 characters in it. For example see the tweets from my 3 Twitter accounts as given below:

1.@rajugunnal
Dont Miss Frank -new Variety/Talk TV show with celebrity guests,comedy & music.Follow@frankdangelo23 & win $5,000

2.@rajugvcp
PureAndHealthy is giving $10 discounts for posting a twitter / FB message! Get yours by visiting www.pureandhealthy

3.@tech2solution
Fun Kids Soccer Where Soccer Begins. Non-competitive soccer classes for kids age 2.5 years old and up. - ad

I have 3 Twitter accounts currently and I am going to increase them to 100s(if I am able to handle them).

When I already have these accounts, then what can be so special that I am willing to have more of such interesting Twitter account?

Well, there are many ways to earn from Twitter marketing. Many sites pay us for posting advertisements which are also known as sponsored tweets. When someone clicks on those tweets we get paid. Different websites offer different ways of earning from the tweets.

1. MyLikes

MyLikes.com is a new advertising platform that connects advertisers and Twitter users. You can make money via tweeting as well as posting links with your MyLikes code on your own website, blog, or online page. They Pay via PayPal weekly, there are many sponsored campaigns to choose from, and you can advertise your own links via MyLikes as well. ponsored Tweets requires a minimum of $ 50 before the user can cash. MyLikes require only a minimum balance $ 2.


2. RevTwt

There are many other websites which pay you by pay per click methods when someone clicks on the tweets you post on your Twitter account. This means that you sign up to the websites and give them permission to select the ads for tweets and post them on your Twitter accounts. When someone clicks on it, you get paid. Generally, different websites pay different amount of money for each click. Revtwt pays you 5 to 20 cents per click. Payment is through Paypal when you reach $20 and through check when you reach $100.

Click Below to Login


3.SponsoredTweets

SponsoredTweets.com is a Twitter advertising platform, owned by IZEA, that connects advertisers with Tweeters. Advertisers can create sponsored conversations on Twitter. Tweeters can earn money for spreading the word. Think of it as the Pay Per Tweet version of Pay Per Post.
You only need to allow SponsoredTweets access to twitter account to it can calculate the value of a tweet or click on each click.

Click Below to Login
SponsoredTweets referral badge

4.Magpie
Magpie is also a good site to earn from twitter, only you need to tweet ads, Only bad thing would be that if the tweets posted by Magpie would be looking like Spam you are risking your account because your followers may stop following you and start ignoring you. Though you have the option to limit the number of tweets you would allow them to make and also have a disclaimer before or after the tweet message in order to make your followers know that these are paid tweets.Minimum Cashout Amount is 50$.

Click Below to Login
Launch viral advertising campaigns on Twitter with Magpie!

5.Twittad
Twittad is also site where you can tweets their ads and earn money from twitter account, Minimum withdrawal amount is 30$.

Click Below to login


This above given are the beast sites from where we can earn money from twitter account, My favorite site in above is MyLikes
There are also some other sites similar, but not much popular.
1.BeTweeted
2.Twivert

All the best goahead and Earn online.

Regards
Raju Gunnal

Wednesday, February 2, 2011

Installing HP Device Manager for Controlling HP ThinClient


Installation and Requirement
HP Device Manager Installation


HP Device Manager

HP Device Manager is a server-based application that provides sophisticated centralized administration capabilities for Thin Client devices running HP software. Features of HP Device Manager include:
 Centralized management of software configuration and upgrades.
 A central server-based database.
 The ability to easily create, store and update tasks.
 The ability to access any file or the system registry in thin client devices.
 XML-based task file.
 Design tool for administrator to create tasks.
 User-friendly graphical user interface.
 Easy and powerfull repository management.
 Support for WAN environment.
 Windows CE device management.
 Linux device management.
 Easy to change Enhanced Write Filter setting for XPe Agent.
 The ability to adjust the response time.
 Communicate with Data Encryption and Data Compression between HP Management Server and HP Management Gateway.
 Easy to set the work mode of Agent.

Overview
HP Device Manager is structured as a Console-Server-Gateway system.

HP Management
The HP Management Console is the user interface of HP Device Manager. Several HP Management Consoles can interact with an HP Management Server. The console allows system administrators to view details for each controlled device, organize device trees, create and maintain remote job definitions, and monitor tasks sent out to devices.

HP Management Server
The HP Management Server controls agents through the HP Management Gateway. Tasks stored asTask Templates on the server, can be sent to each agent through each agent’s respective gateway to perform commands as required.
HP Management Gateway
The HP Management Gateway servers as the link between devices and the HP Management Server. Device register with the gateway when they are started. The machine installed with the HP Management Gateway also normally contains the PXE Server installed by HP Device Manager.
Device Agent
The HP Management Agent is a software component installed on thin client devices so that HP Device Manager can interact with them. Agents are embedded into each HP operating system to enable Device Manager to manage devices out-of-the-box. Agents get tasks commands, execute the commands and report on their status.

Installing HP Device Manager
Components
HP Device Manager consists of four modules:
 Management Console
The graphical application used by administrators to access the management system.
 Management Server
The central server which consolidates and controls all management activities.
 Management Gateway
The gateway which serves as the link between Agents and the Management Server.
 Management Agent

Software installed on the client to enable device management

The Management Console, Management Server and Management Gateway may be installed on
Same machine, or on different machines separately.

System Requirements

Management Console

The Management Console can be installed on any number of machines. The following environment is required:
 Operating System
Windows 2000 Professional (SP4)
Windows 2000 Server (SP4)
Windows XP Professional (SP2)
Windows Vista
Windows 2003 Server
Windows Server 2008

 Third-party Software
Java Runtime : SUN java Runtime Environment Version 6.

 Hardware
Pentium-lll or greater
512 MB RAM
256 MB free disk space

Management Server
The Management Server should be installed on a single machine. The following environment is required
 Operating System
Windows 2000 Server (SP4)
Windows 2003 Server
Windows Server 2008

 Third-party Software
Java Runtime : SUN Java Runtime Environment Version 6

DBMS- any of the following are supported : Microsoft SQL Server 2000 or 2005, Microsoft SQL Server 2008; PostgreSQL

 Hardware
Pentium lll or greater
512 MB RAM
512 MB free disk space

Management Gateway

The Management Gateway may be installed on multiple machines. However, only on Gateway should be present on a subnet. The following environment is required:

 Operating System
Windows 2000 Professional (SP4)
Windows 2000 Server (SP4)
Windows 2003 Server
Windows Server 2008

 Hardware
Pentium-lll or greater
512 MB RAM
512 MB free disk space

Management Agent

The Management Agent should be installed on each thin-client device that will be managed by the system. The following environment is required:

 Operating System
HP XPe
HP CE 6
HP Linux Debain
HP ThinConnect
HP ThinPro
HP ThinPro GT
NeoLinux 4.0.1
NeoLinux 4.0.1
NeoLinux 3
Neoware XP embedded 1.4.2 or later
Neoware CE 8.1
Maxspeed XPe
Maxspeed CE

 Hardware
Thin-Client device supporting one of the operating system listed above with 2 MB free disk space
Additional Requirements

To support communication between the different components of the system the network must provide open access on certain ports. In addition to transfer large files between components, FTP server must be accessible by the system.

 Recommended FTP Servers-Third-Party Software
Filezilla Server
Microsoft Internet Information Server (IIS)
Rhinosoft Serv-U FTP Server 4
SCO Unix OpenServer FTP Server

 Network Requirements

The network should not contain any other running PXE servers. The network should permit free communication on ports used by HP Device Manger. HP Device Manager only supports IPv4 networks

A number of UDP and TCP ports are required for client/server communication. Given below are the standard ports required,

If we are using a Server behind a firewall, please add ports 1099 and 40002 to the exception ports in the firewall settings.

Standard Ports Required
Port Protocol Purpose
67 & 68 UDP PXE-Bootstrap
69 UDP TFTP (Trivial File Transfer Protocol)
4011 UDP DHCP Proxy Server (This is an alternative to ports 67 & 68 if those
Ports are not available)
20 & 21 TCP FTP (Used for the Repository)
5900 TCP VNC Server
5500 TCP VNC Viewer in Listen Mode


Custom HP Device Manager Ports Required

Receiver Port Sender Receiver Protocol Purpose
1099 Console Server TCP Console queries the RMI Registry.
40000 Server/Agent Gateway UDP Server/Agent polls Gateway.
40001 Gateway Agent TCP Gateway sends task to Agent
40002 Console Server TCP Console calls the remote objects on
Server by RMI
40003 Server/Agent Gateway TCP Server sends task to Gateway. Agent
Sends report to Gateway.
40005 Gateway Server TCP Gateway sends report to Server
40006 Server PostgreSQL TCP The default database PostgreSQL list
Listening port.
40008 Gateway Gateway TCP Gateway notifies Gateway Controller
Controller running in the same subnet
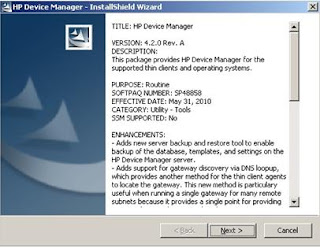
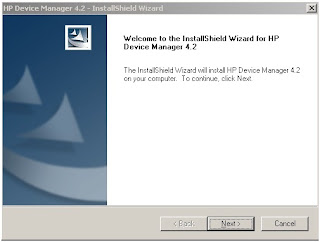


Installation Procedure

1. Run the Device Manger setup file. This installation’s introductory dialog box will appear.


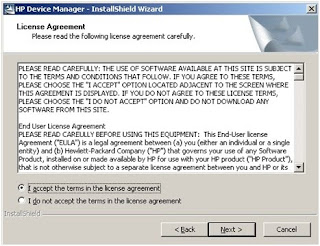
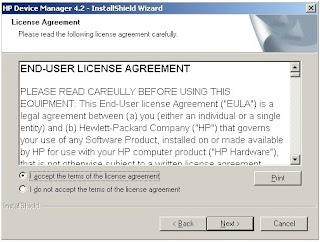
2. Select the I Accept the terms in the license agreement and click on next


3. Here shows the location to unpack the setup file.


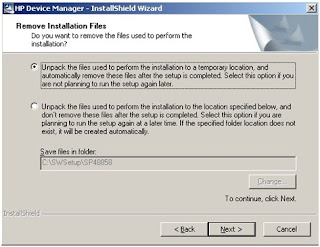
4. Select the below given default location and click on Next


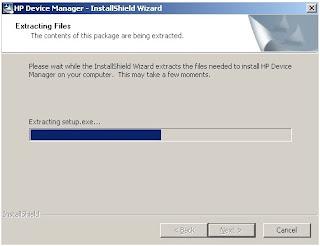
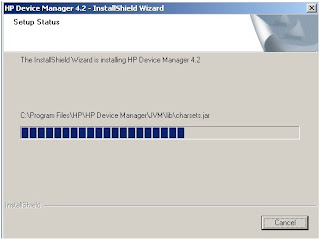
5. The unpack is started and it will soon start the installation.


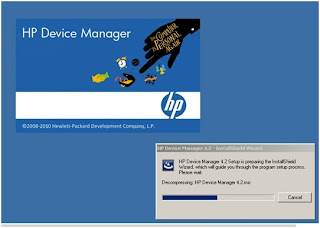
6. See below HP Device Manager installation starts.


7. Click on Next


8. Select I accept the terms of the license agreement and click on next


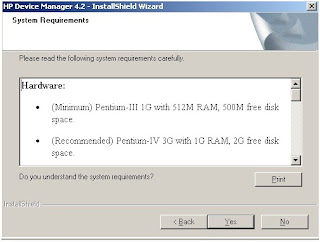
9. Check the Hardware requirement in below table, if your not meeting the hardware requirement install it in the good hardware.


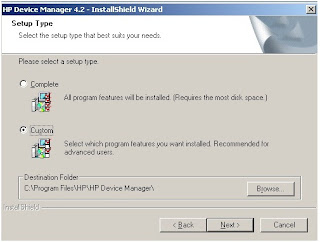
10. Select the Custom for installation.


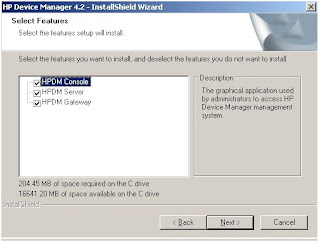
11. Check the box for HPDM Console- if your installing and want to manage HPDM console
HPDM Server - if you want to install HPDM Server in the Same machine
HPDM Gateway-if you want to install Gateway server also in the same machine.


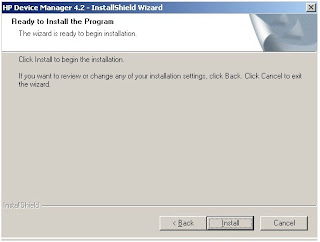
12. Now after select the above option click on Next and install.


13. The Installation will proceeds.


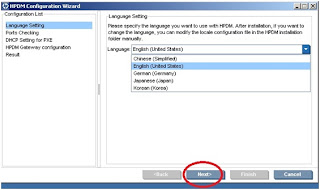
14. Select the Language type you want to install and click on Next


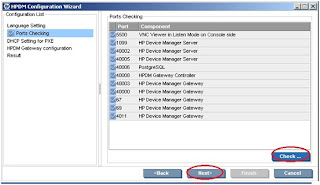
15. You can test the ports available by clicking on Check button, if you got any error than you need to check the require port is available or using by any other application. And click on Next


16. Select the first DHCP server if your DHCP server is not located on this machine.
Select the second DHCP server if your DHCP is located on this machine only.


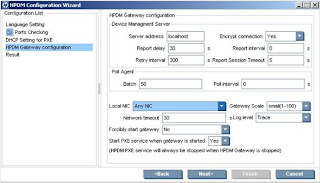
17. See the below given details if you want to edit any changes you can do it, but recommended to put it default only and click on Next


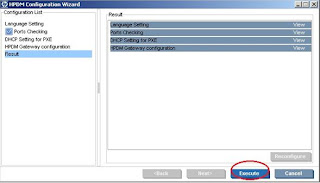
18. Now Click on Execute


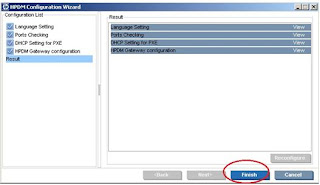
19. Click on finish to this installation and start the SQL installation.


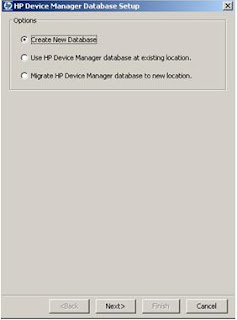
20. Select the Database type you want to install.


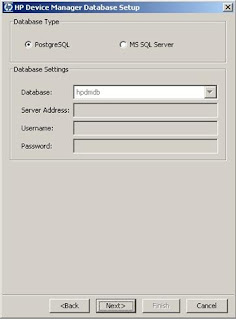
21. Select the type of SQL you want to install.


22. Give the Root password (Important : Please do remember this password)


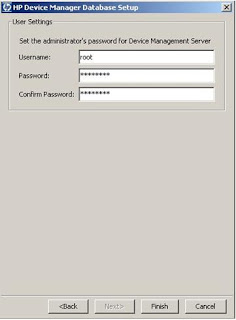
23. The Administrative settings finished.
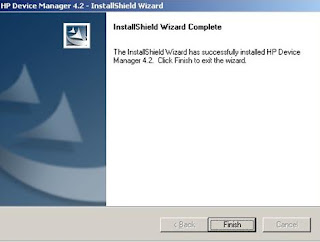


24. Click on Finish


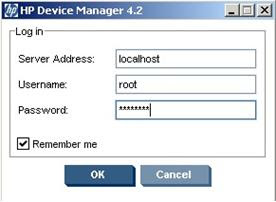
25. HP Device Manager Icon will come on the desktop. Click on it.


26. Enter the root and root password to login into the HP Device Management Console.


27. The HP Device Manager Console Looks like this.


Configuring DHCP Boot Options


Now we will configure DHCP boot options , it is required to allow the required ports


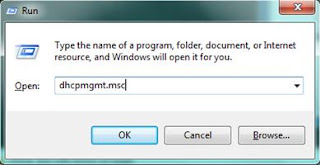
1. Login into the DHCP server with Administrative Previleges.


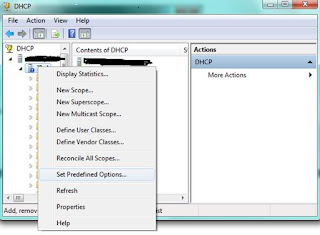
2. Right Click on the DHCP server and select the “Set Predefined Options” from the menu


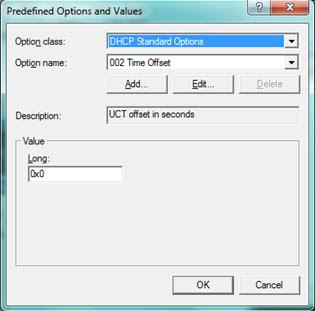
3. Click on “ADD” button on the Predefined options and values window


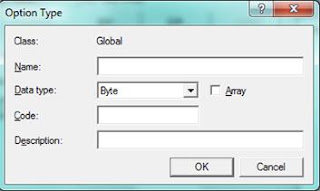
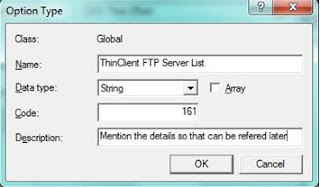
4. You will get the following window.


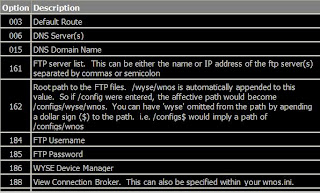
5. Here I have provided the following example for option ID 161 :


Click on OK
6. Repeat the Steps from 3rd to 5th for rest of the DHCP Options i.e. -161, 162 ,184, 185, 186 and 188 on your DHCP Server
a) In the Name field mention the Brief description of the new Option Value.
b) In Data Type change the value from ‘Byte’ to ‘Sting’
c) Enter the DHCP Option in the field i.e. (161)
d) Provide the brief description in the ‘Description’ field as its help you to refer in future, for that this value added.


Creating the DHCP Scope for ThinClient

We have to create the DHCP Scope and assign the relevant values to it:
1.From the DHCP snap-in , right click on the Hostname of DHCP server and select ‘New Scope’.

2. You will see the wizard for creating New Scope ,Click on Next


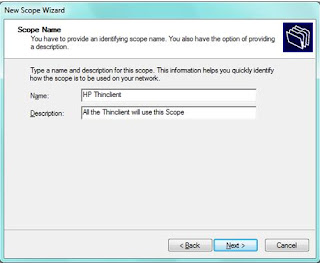
3. Provide a name and description for your new scope and click on Next


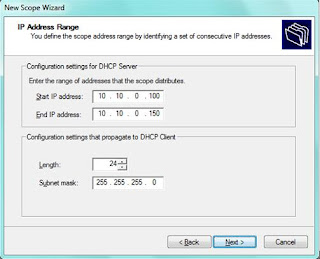
4. Now provide the relevant IP block and subnet information for the scope and click on Next to proceed


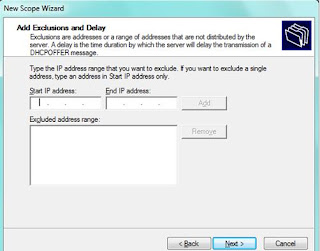
5. Enter if any Exclusions for the Scope and click on Next


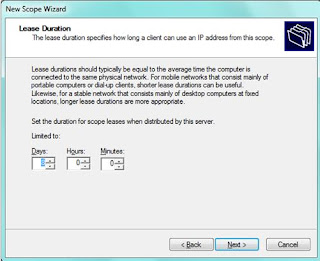
6. Enter the Desired lease time and click on ‘Next’


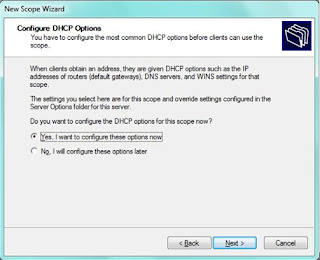
7. Select “Yes I want to configure these options now” value and click on Next


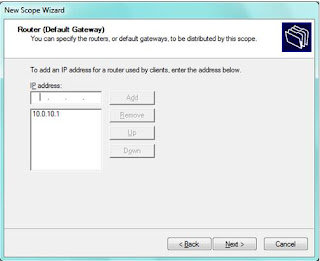
8. Add your default Gateway and click on Next


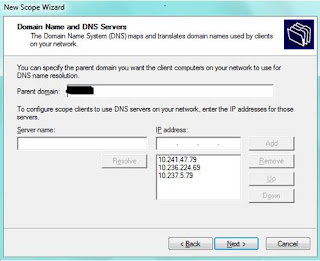
9. Provide you DNS name and click on Next


10. Provide the WINS server and Click ‘Next’


11. Select ‘Yes I want to activate this scope now’ option , click on Next and Finish

Saturday, January 1, 2011

Google unveils new interactive Christmas Doodle Festival

In its most ambitious holiday doodle project yet, Google has unveiled 17 illustrated portraits as its new Christmas doodle on its home page. It will remain on the site for two and half days.

The new doodle displays a collection of festive scenes of people, places and cuisines across the world that seen in summation approximately joins to spell out the company's logo.

Google has, over the years kept its doodles, the illustrations that occasionally adorn the search engine's logo, relatively simple.


The logo, which is hidden in the set of pictures, is interactive. Hovering over the icons enlarges the images to let viewers see details of the design. Clicking on a scene opens a Google search page that reveals the origin of the paintings.

The scenes display drawings of St. Basil's Cathedral in Russia, Buche de Noel, a Christmas dessert served in different countries, Santa Claus and his reindeer atop a roof depicting "Up on the Housetop," a Christmas song created in 1860 and Indian classical dances, among others.

Google doodles have gained immense popularity over the past few years and the Google team has put out commemorative doodles on events ranging from news events, civic milestones, birthdays, death anniversaries and important dates in history.

Doodles have celebrated the Fourth of July, the Olympics, and John Lennon's 70th birthday.

The Wall Street Journal quoted Micheal Lopez, in charge of the Google Inc. doodle team, as saying that creating this year's holiday doodle took five artists about 250 hours.

It will be opened by hundreds of millions of people.

Google estimates it has created more than 900 doodles since 1998, with 270 of them running in 2010. Some appear globally, and others are tailored for local markets outside the US, such as Kenya Independence Day, according to WSJ.

Lopez's concept for the doodle is a representation of the Google logo through 17 interactive portraits of holiday scenes from around the world.

The 17 portraits are St. Basil's Cathedral, Acropolis, Buche de Noel, Pierogi, Great Wall of China, Mt. Fuji, Indian dance styles, Sahara desert, chili pepper, oud, Sydney Harbour, Venice gondolas, Nepal, Chilean vineyards, African kanga, Henna lamp, and the carol Up on the Housetop.

Wednesday, December 8, 2010

Closing Single Excel File Closes All Excel-Solved!!

Hi All,
Solved!!You might have facing this problem, like when you opened a Excel file and along with it you have open other Excel files, so when you Close any of the Excel files it closes all the Excel file,You can overcome this the Solution mention below.
1.Open the Windows Explorer-Go the Tools-Folder Options
2.Select Files Types.
3.Now Scroll Down to XLS and Click on Advanced4.Select Open , then Edit5.Here untick "Use DDE"
6.Change "Application Used to Perform this action" to
"C:\Program Files\Microsoft Office\Office12\EXCEL.EXE" "%1"7.If you are using Office 2003 you need to select "C:\Program Files\Microsoft Office\Office11\EXCEL.EXE" "%1"Click on OK

Now check by opening Multiple Excel file, you can see it normally, when you close a single Excel file it will close only single Excel.

Regards
Raju Gunnal

Tuesday, December 7, 2010

You may not power on a virtual machine in a virtual machine


HI All,
"You may not power on a virtual machine in a virtual machine" this kind of error comes when you run vmware vm , in Esx installed in VMware Workstation.
To rectify this error, you need to edit the .vmx file, follow the below given steps
1.Suppose you are running VMware Workstation in your physical box.
2.And you have installed ESX under the VMware workstation.
3.After Installing ESX you now tried to connect that ESX through Vsphere Client, and you got connected Successfully.
4.After the Vsphere Client connected Successfully, now here you will try to create a VM and after creating that VM, when you try to power on that VM you will get this error.
"YOU MAY NOT POWER ON A VIRTUAL MACHINE IN A VIRTUAL MACHINE"
5.To Rectify it, just go to the VM files , of the ESX,which you may have stored in your local HardDisk(The VM which you have created under VMware WorkStation).
6.Go to that ESX files location and locate .VMX file and open it with Notepad.
7.After opening the VMX file edit it with the following line.
monitor_control.restrict_backdoor="true"
8.Save that notepad file and exit.
9.Now start that ESX and connect through Vsphere Client and Start the VM which you have created.
It will start Normally,
Any issues just put a comments here.
All The Best

Regards
Raju Gunnal

Monday, December 6, 2010

Enable Remote Desktop Remotely

Hi All,
You can enable Remote system in a network, without going to the physical machine,just you are few steps have a look.
1.Go to Run-Regedit click on OK
2.Registry Editor will now open, now click on File then select Connect Network Registry.
3.A new window will appear, here enter the IP address or system name of the computer to which you want to enable remote Click OK
4.If you have logged in with local admin rights than , the other system registry will open directly, or else it will ask for user id and Password.
5.Now you can find the registry of that machine.
6.Now in registry browse to HKEY_LOCAL_MACHINE\SYSTEM\CurrentControlSet\Control\Terminal Server , here in the right panel side select fdenyTSConnection(REG_DWORD).
7.Change the value data from 1 (Remote Desktop Disabled) to 0 (Remote Desktop Enabled)
8.Now exit the registry.
That's it now you have completely enabled the remote connection to that machine, without restarting that machine you can now access it remotely.

Regards
Raju Gunnal

Friday, December 3, 2010

An authentication error has occurred (Code: 0x507) SOLVED

Hi,
"An authentication error has occurred (Code:0x507)" this kind of error you might have faced, usually you will get this error when you are accessing Windows Server 2008 OS remotely from Windows XP SP2 or SP3 ,Windows 7,Windows Server 2003, this error wont allow us to connect remotely, this happens because of NLA,and some Registry disturbance in local desktop, The solotion for it is:
1. Try to login with different user in that system where you used to code 0x507 error.
2.After login with other user name try to access remote of windows server 2008.
3.Now you can access Windows Server 2008.

Use the following steps if the above wont works for you.

1.Just rename the existing profile in that system.
2.Login with your id now and take Windows Server 2008 remote it will work fine.

Post comments if you got any issues

All The Best!!

Wednesday, December 1, 2010

Run VMware Vsphere 4.0 in VMware WorkStation 7

Hi All,
You can run VMware Vsphere 4.0 in VMware Workstation, i am providing the steps how to do that below.

1.Before Starting VMware Vsphere 4.0 in VMware Workstation 7 your Desktop or Laptop must meet the hardware requirement.
2.Your Desktop or Laptop should be 64 bit and VT must be enabled in the BIOS and should have good amount of memory.
3.Go the the BIOS of your system and enable VT or Virtualization.
4.Ok, now You can download a trial version of VMware Workstation 7 and VMware Vsphere 4.0 from VMware site.
5.Now, Run the VMware Workstation 7 in your system, its default installation go with next, next , next.. finish.
6.Once the VMware Workstation Installed,open it from Start Menu or from Desktop icon.
7.There you can create a new VM, in OS option select VMware Kernel 64 bit, and give the required HardDisk Space and importantly assign Memory minimum of 2 GB.
8.Now, Go to the settings of just created VM in CD place show the path ISO file which you have downloaded from VMware Site and above to that select CD connected when VM power on.
9.Click OK, Now go to the file where you have created that ESX VM, and select the .VMX file right click on it and open it with notepad.
10.Once you have Opened .VMX file with notepad go to the bottom of that file and add these line.

"monitor_control.backdoor_restrict=true"add above given line without any inverted comma's
10.Now, start the VM,once you start the VM you will find VM will start booting up and soon you will find the VMware Vsphere 4.0 Installation menu.
11.As you are installing it for test environment, you can go ahead with default installation, but for production installation you must follow with the VMware Vsphere 4.0 installation guide.12.In the installation process give the time zone,and root password whereever it ask and give one Static IP, ip should be in such a way that it should communicate with your physical BOX.
13.After installation finises, VM will reboot.
14.Now, you can find the VM Vsphere started completed onthe main screen you can find the url or ip which you have given it for installation.
15.Go to the browser of your physical system enter the ip which you have given in vm vsphere 4.0 installation and click on enter.
16.For first time when you open that ip you will get with SSL certificate message, add that SSL certificate.
17.Now , you will get the screen with the VMware Vsphere login page, there you will also get link to download Vsphere Client Download, just click on it and download it.
18.After Downloading Vsphere Client, install it on your physical machine.
19.Now open that client and give the IP of the vmware vsphere 4.0 which you have given and in username place give root and password of that.
20.Once you click on login you will again get the ssl message, select ignore and install.
21.Now the next screen will appear with your Vsphere 4.0 infrastructure.
22.Now in that you can create the VM also.

That'st it this way you can install VMware Vsphere 4.0 in your VMware Workstation 7.if you need any help or got any error while installating it you can post comments to me.

All The Best!!!!!!!!!!!

Friday, November 26, 2010

Unable to Connect VMware WebAccess

Hi All,
If you are unable to connect to esx through webaccess. You can connect it by this comman .
1.First login in the Esx server console.
2.Login with root or any other account which you have created while installing Esx.
3.Type "service vmware-webAccess start" without quotes.
4.Now try to connect Esx WebAccess.You can connect now.

Regards
Raju Gunnal